User Guide
Everything you need to get from sign-up to your first submitted bid — quickly.
On this page
Getting Started
Creating your account takes under two minutes. Follow the steps below and you'll be searching for bids right away.
- 1
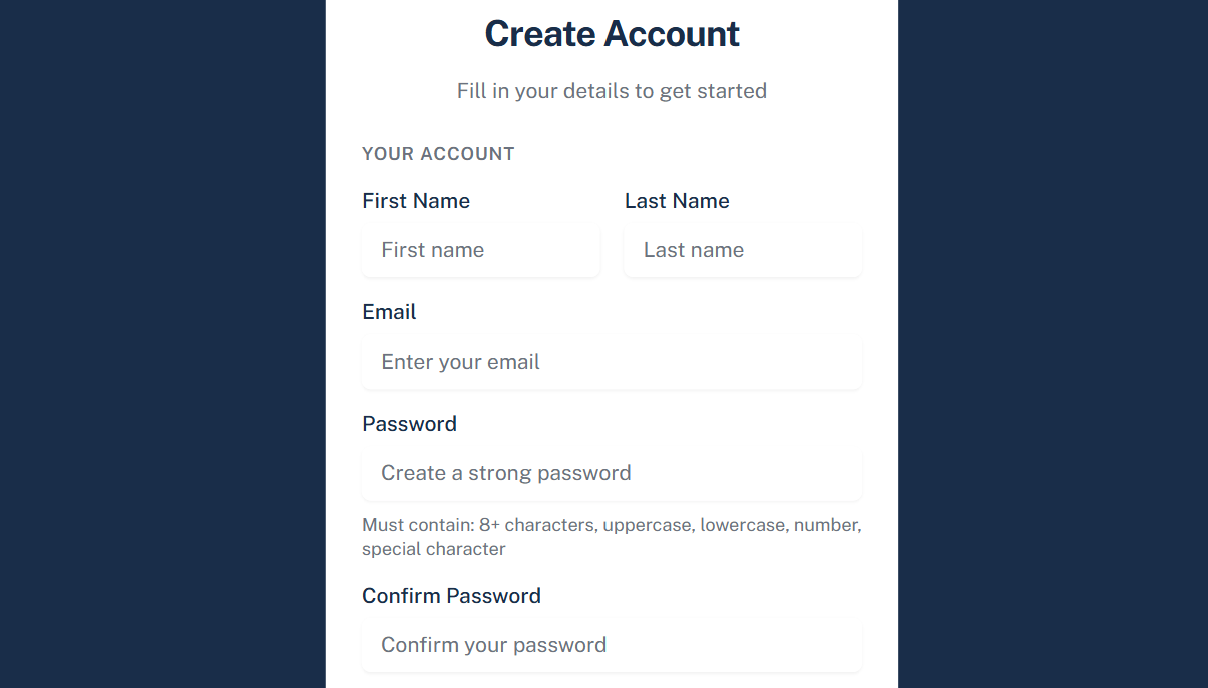
Go to bidfinder.net/register and enter your name, email, and a password.
- 2
Check your inbox for a verification email from admin@bidfinder.net and click the confirmation link. If it doesn't arrive within a minute, check your spam folder and add the address to your contacts to prevent future emails from landing there.
- 3
After confirming your email, you'll be taken to the Plan selection page. Choose Basic or Pro to activate your account. See Pricing for a full breakdown of what each plan includes.
- 4
You're in. Your Dashboard is your home base — from here you can jump to Search, check your Watchlist, or re-run a saved search.
Tip
Note
Dashboard
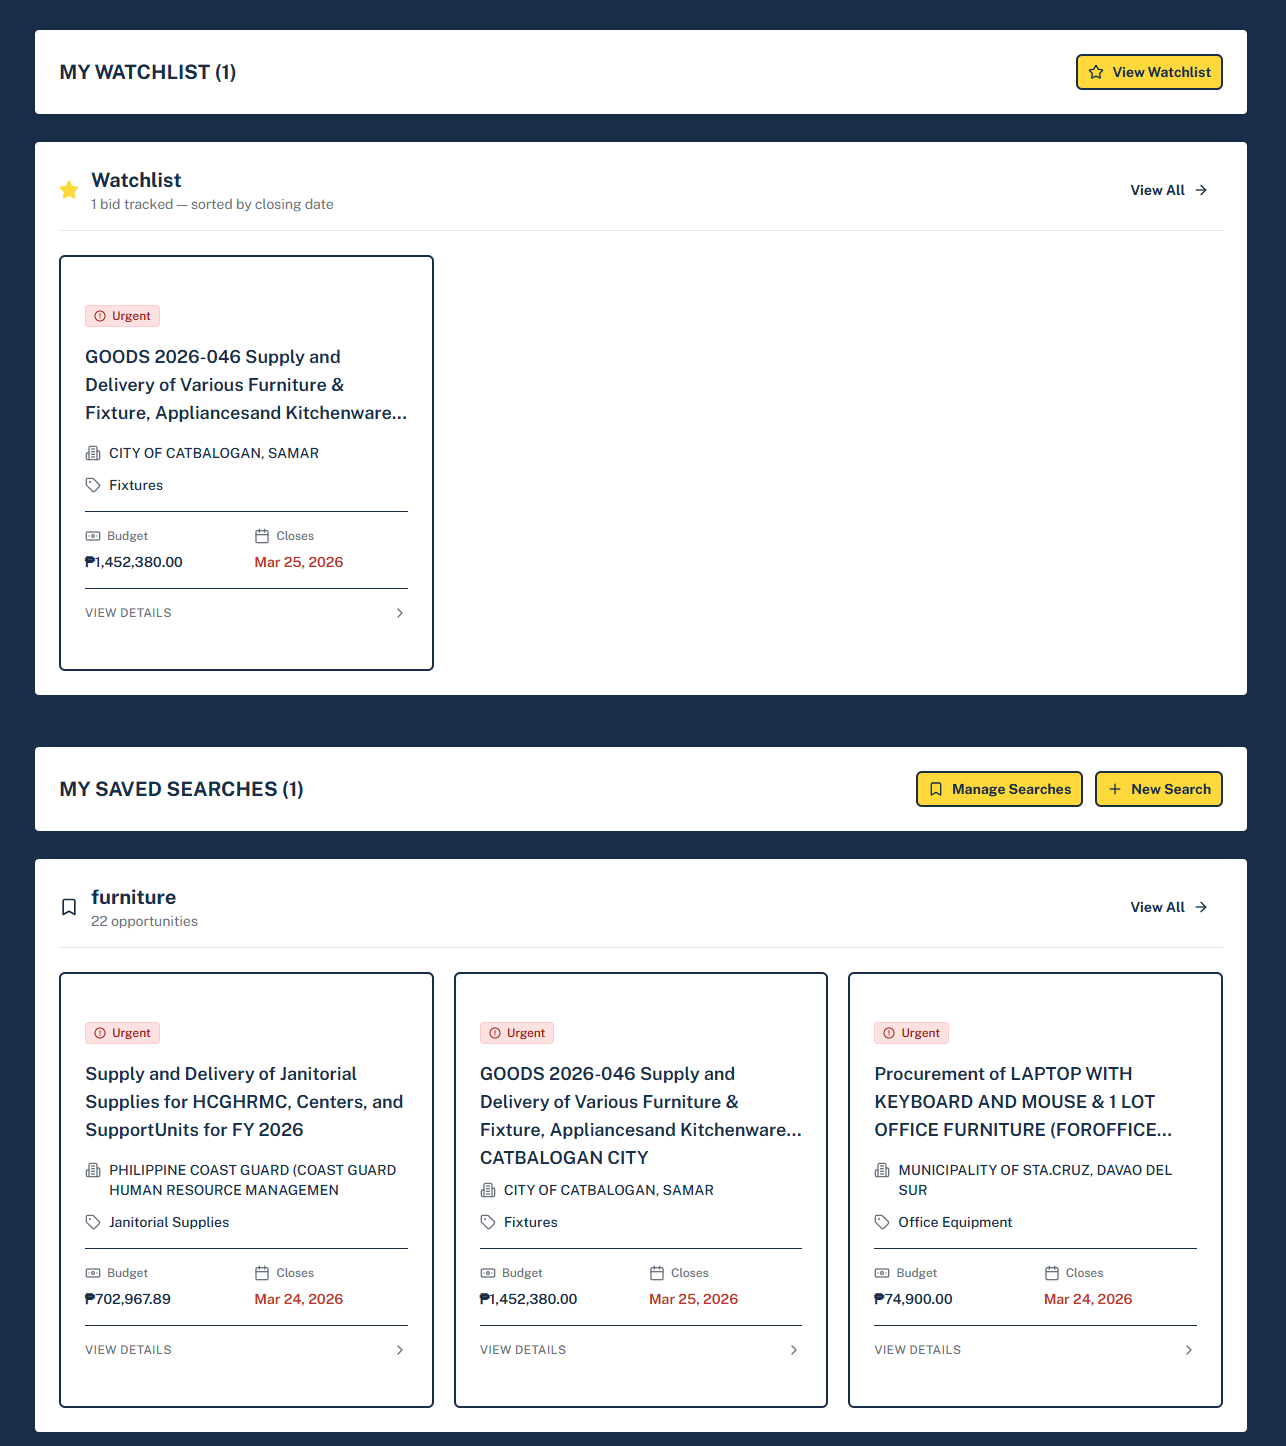
The Dashboard is the first screen you see after logging in. It surfaces your Watchlist and your alert results at a glance — so you can spot new matching opportunities without running a single query.
- Watchlist preview: Shows how many bids you're tracking along with a preview of recent entries. Click View Watchlist to see the full list with closing dates and days remaining.
- Alert previews: Up to 3 of your alerts are displayed, each with their 3 most recent matching results pulled live. Click a bid to open its detail page, or click the alert name to run the full search with all its filters.
- Manage Alerts / New Search: Buttons at the top of the alerts panel take you to the Alerts tab or let you start a fresh search.
Tip
Navigating the App
The dark navigation bar at the top of every page is your main way around Bidfinder. It stays fixed while you scroll so it's always within reach.

Main Links
- Dashboard — your home base. Watchlist preview and alert results at a glance.
- Search — the main search workspace. Keyword bar, filters, and results all in one page.
- Watchlist — your starred bids. Full list with inline document summaries if generated.
- Alerts — manage all your alerts from the Alerts tab inside Search. Toggle email digests, change frequency, and see last-run results.
Points Balance
Your current points balance is displayed in the top-right corner at all times — so you always know how many points you have left for AI-powered document summaries.
Profile Menu
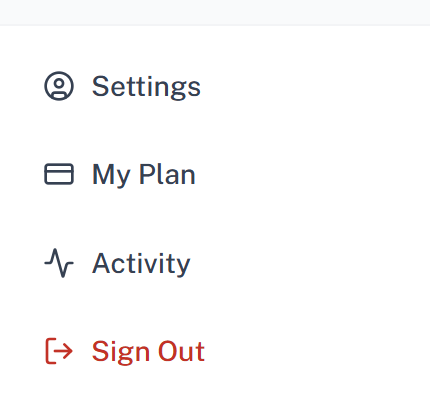
Click your name or avatar in the top-right to open the profile dropdown:
- Settings — Profile, Security, Sessions, and Display preferences.
- Subscription — view your current plan, upgrade, downgrade, or cancel.
- Activity — points balance breakdown and full usage history.
- Sign Out — end your session.
Note
Searching for Bids
The Search page is your main workspace. Type the way you'd describe a contract to a colleague — plain English, Taglish, abbreviations, and natural language all work.
The basics
- Type any term into the search bar — a product, agency, or descriptive phrase — and hit Search.
- Leave the box empty and hit Search to browse all opportunities, sorted by most recently published.
- Use the sort control above the results list to switch between Relevance, Latest Published, Highest Budget, and Lowest Budget.
- Taglish is fine. Pure Tagalog queries may return limited results — the underlying PhilGEPS notices are mostly written in English.
Try a natural sentence
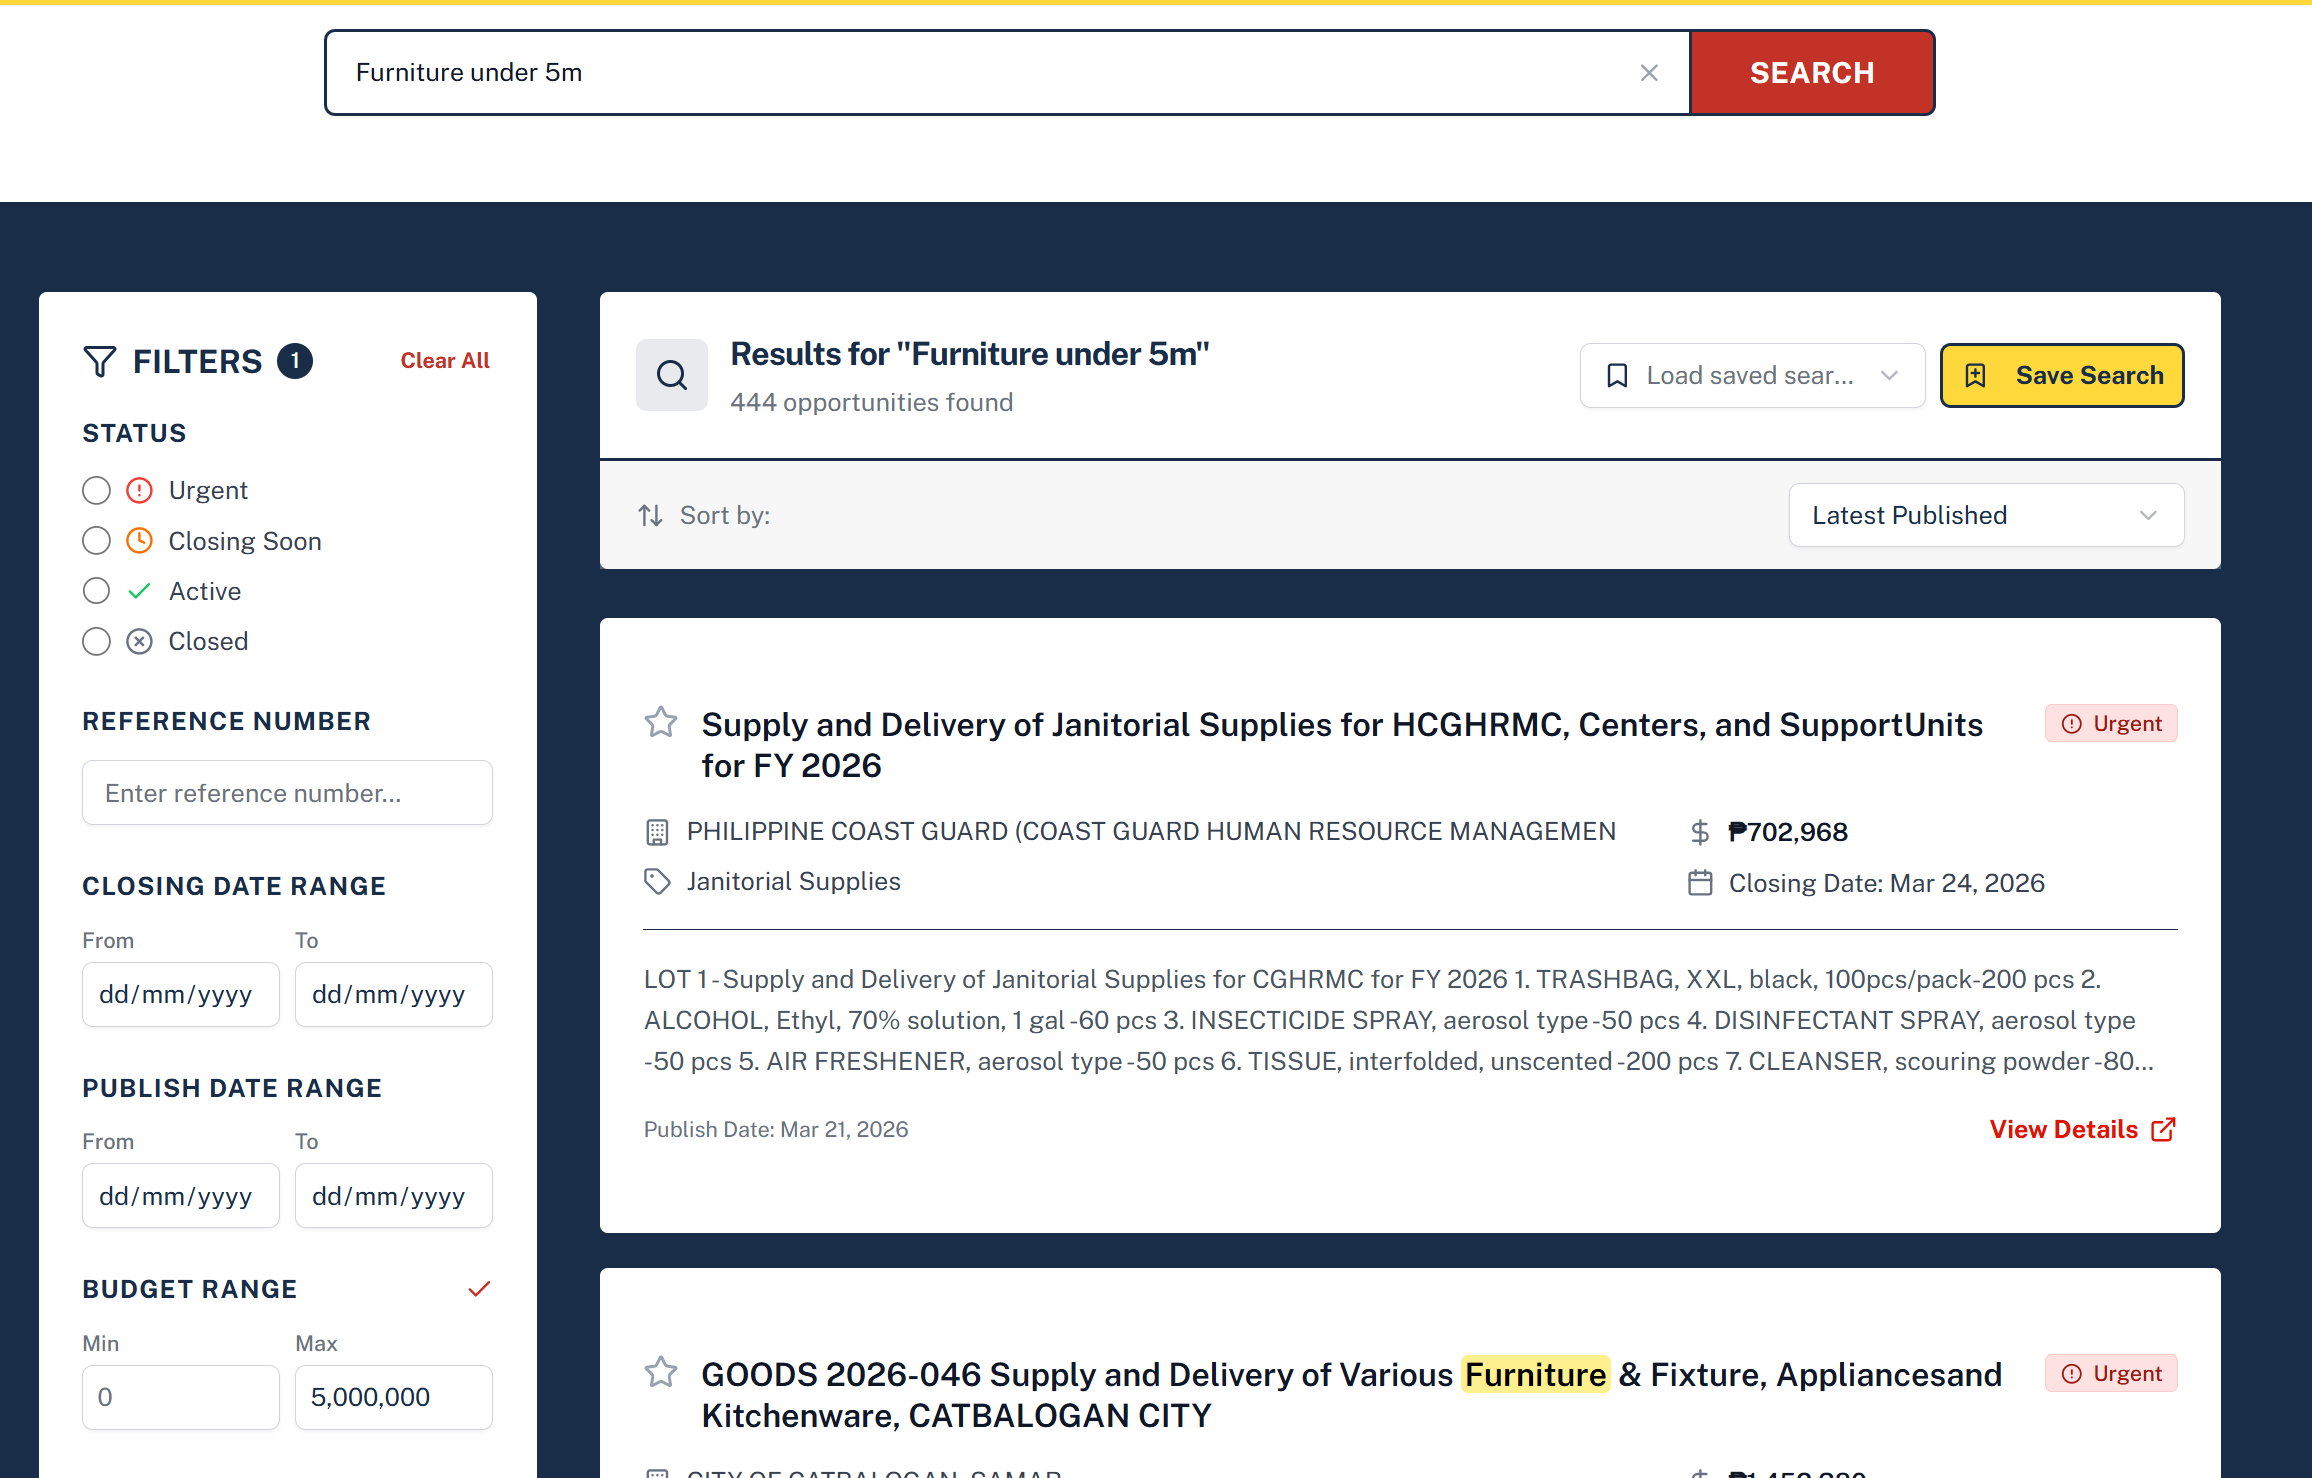
You don't need to think in keywords. Type the way you'd describe the bid out loud — Bidfinder pulls the right filters from your query.
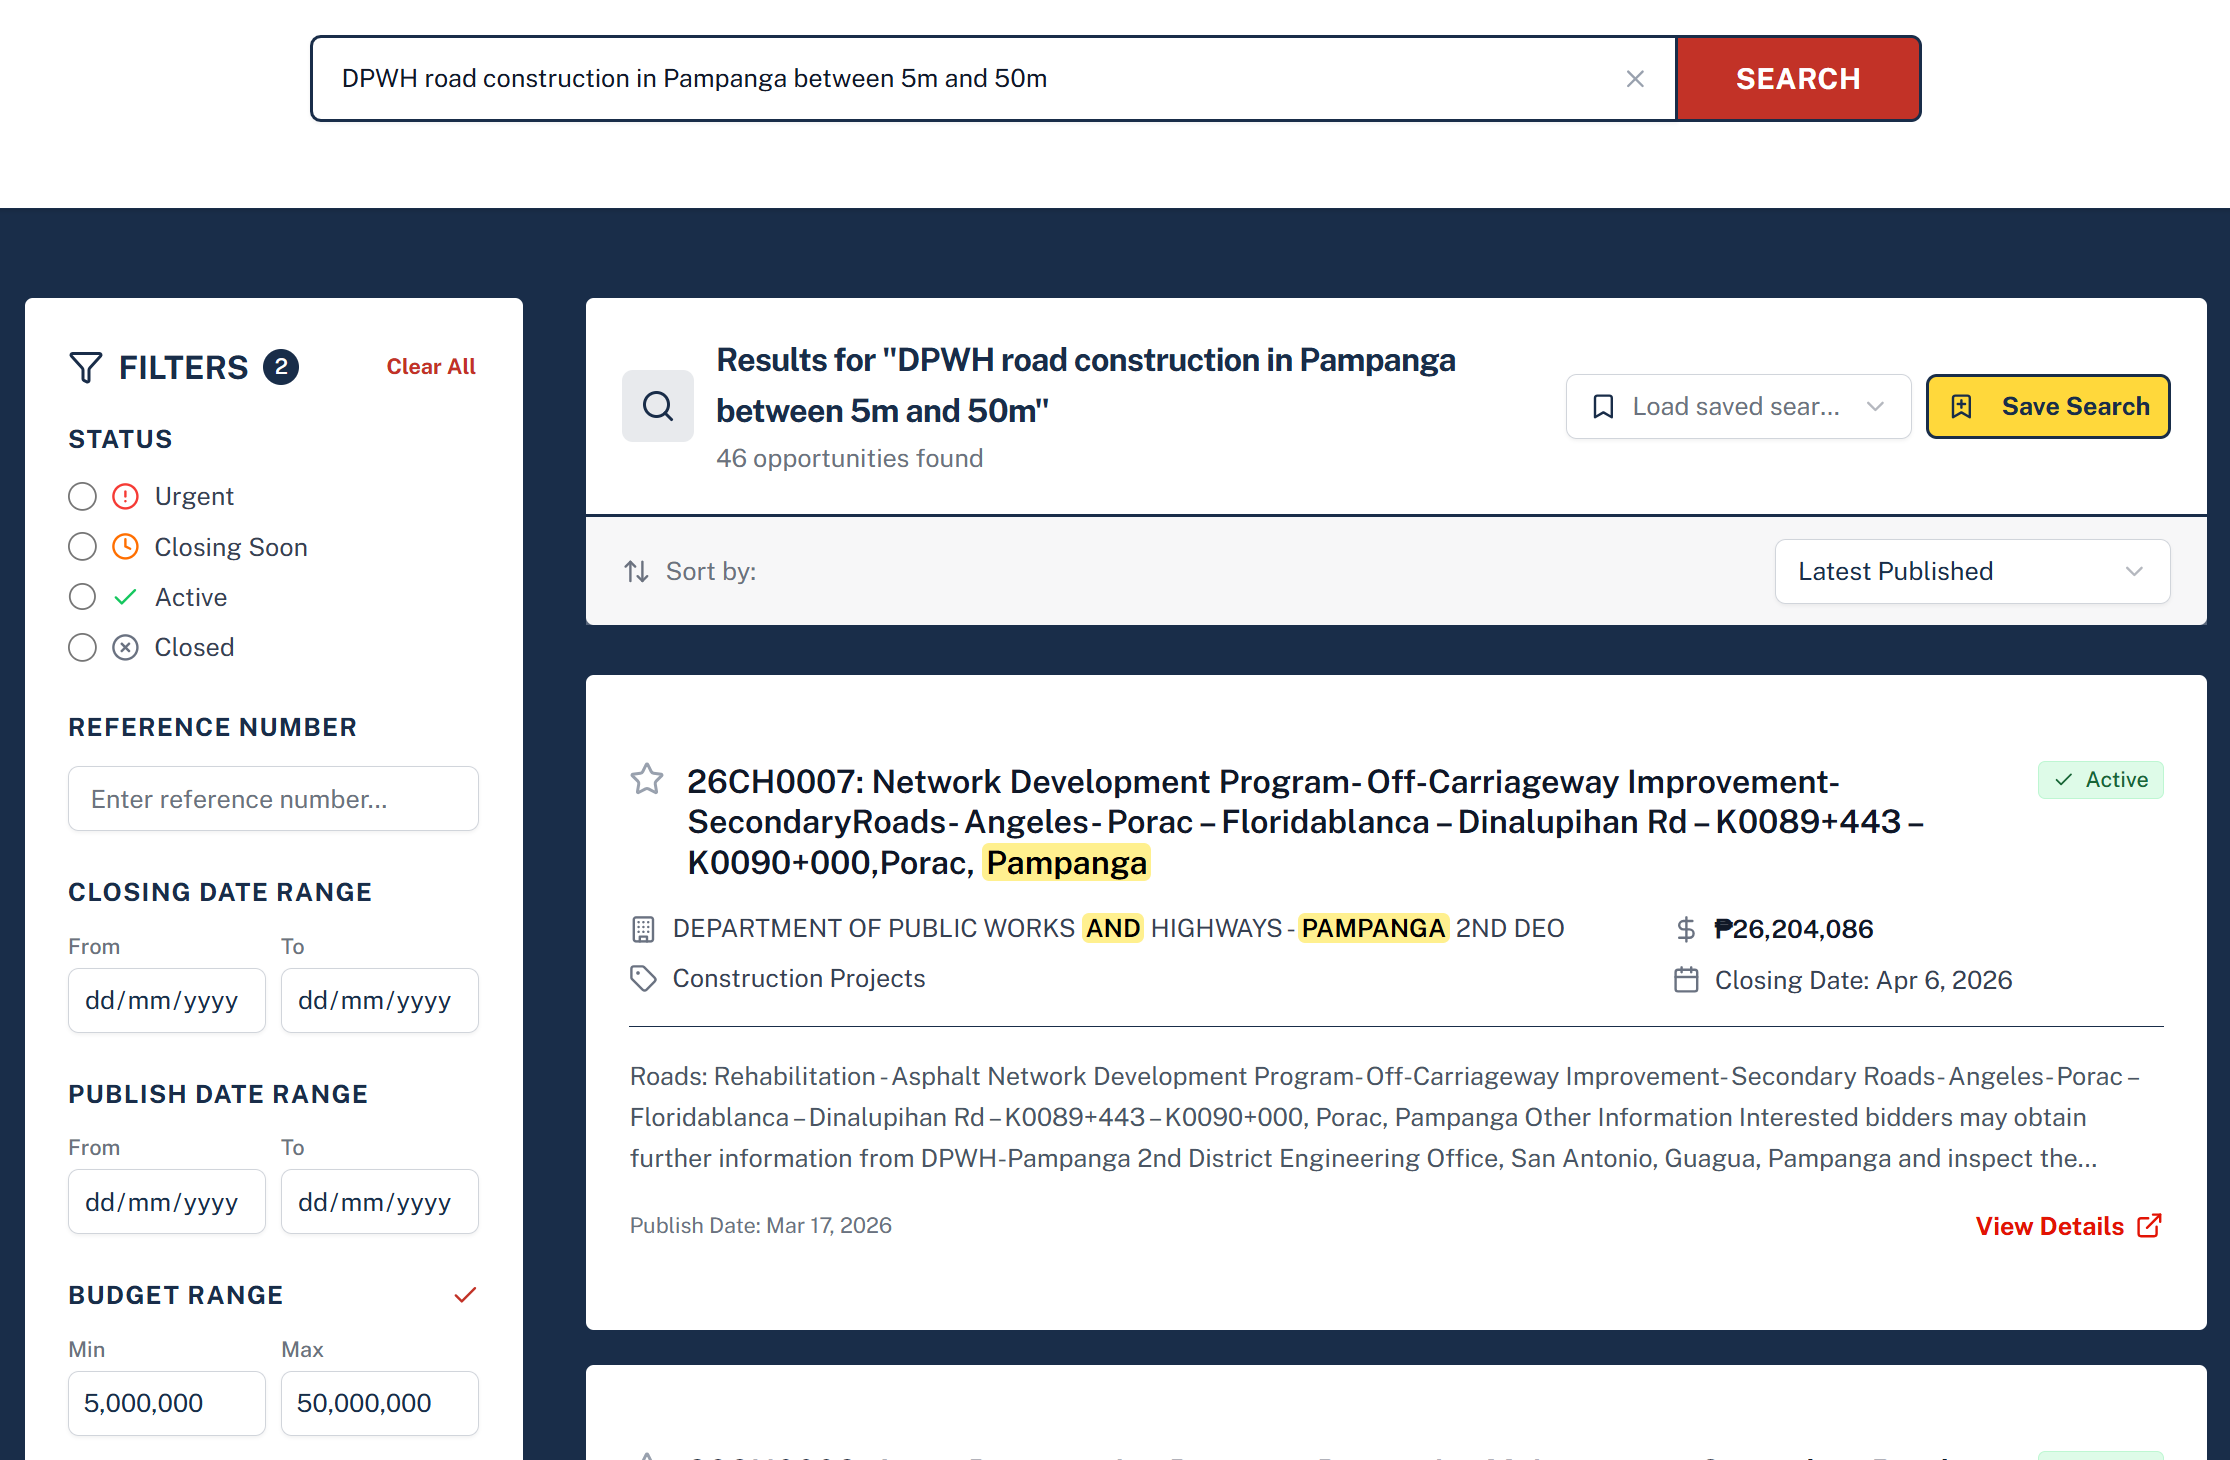
“DPWH road construction in Pampanga between 5m and 50m”
From that one sentence, Bidfinder picks up:
- Agency abbreviation expanded — DPWH becomes Department of Public Works and Highways. DEPED, DSWD, LGU, PNP, DOH, and dozens more work the same way. QC becomes Quezon City.
- Location surfaced — in Pampanga stays in the query so the engine surfaces bids relevant to that area. To restrict by delivery area strictly, use the Area of Delivery filter in the sidebar.
- Budget range parsed — between 5m and 50m sets the Budget filter automatically. The budget phrase is stripped from the search terms so it doesn't dilute relevance.
Full reference: every supported budget phrase
- Maximum — under, below, less than, up to, at most, max:
medical supplies under 500k CCTV below 2M furniture up to 1 million - Minimum — over, above, more than, at least, min:
construction over 10m road project above 5 million equipment at least 2m - Range — dash notation or between / from…to:
IT equipment 1-5m between 500k and 2 million from 1m to 10m - Multipliers — k / thousand, m / million, b / billion. Decimals and commas both work — 1.5m, 1,500,000.
- Location phrasing — in <place> or from <place>:
road construction in Pampanga school supplies from Cebu medical equipment in Davao over 5m
Using Filters
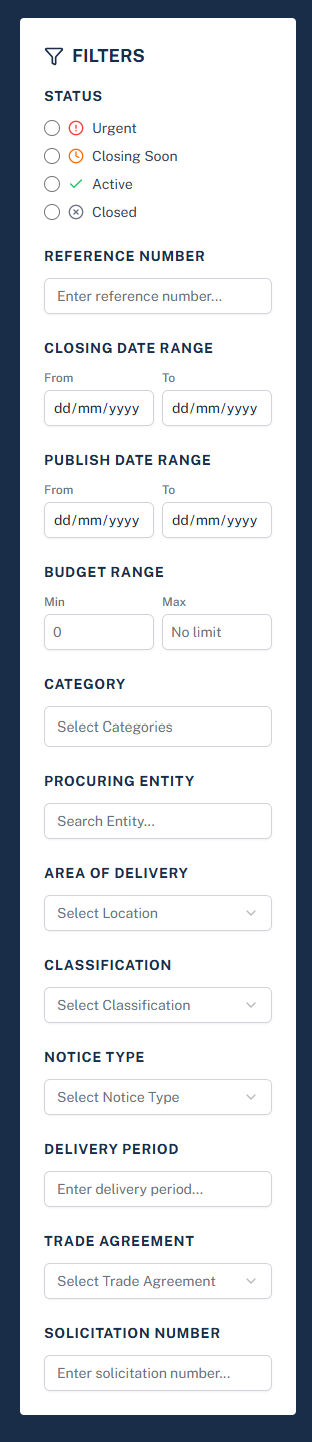
The filter panel sits on the left side of the Search page. Every filter combines with your keyword query — narrow down by status, location, budget, agency, and more all at once.
- Status — Urgent, Closing Soon, Active, or Closed
- Reference Number — Look up a specific PhilGEPS reference number
- Closing Date Range — Find bids closing within a specific window
- Publish Date Range — Filter by when the notice was posted
- Budget Range (ABC) — Set a minimum and/or maximum Approved Budget for the Contract
- Category — Goods, Infrastructure, Consulting Services, and more
- Procuring Entity — Filter by the specific government office or agency
- Area of Delivery — Region, province, or city where the contract will be delivered
- Classification — e.g., Citizen's Charter, Common-Use Supplies
- Notice Type — Invitation to Bid, Request for Quotation, etc.
- Delivery Period — Duration of contract delivery
- Trade Agreement — Filter by applicable trade agreement
- Solicitation Number — Search by a specific solicitation number
Tip
Note
Alerts
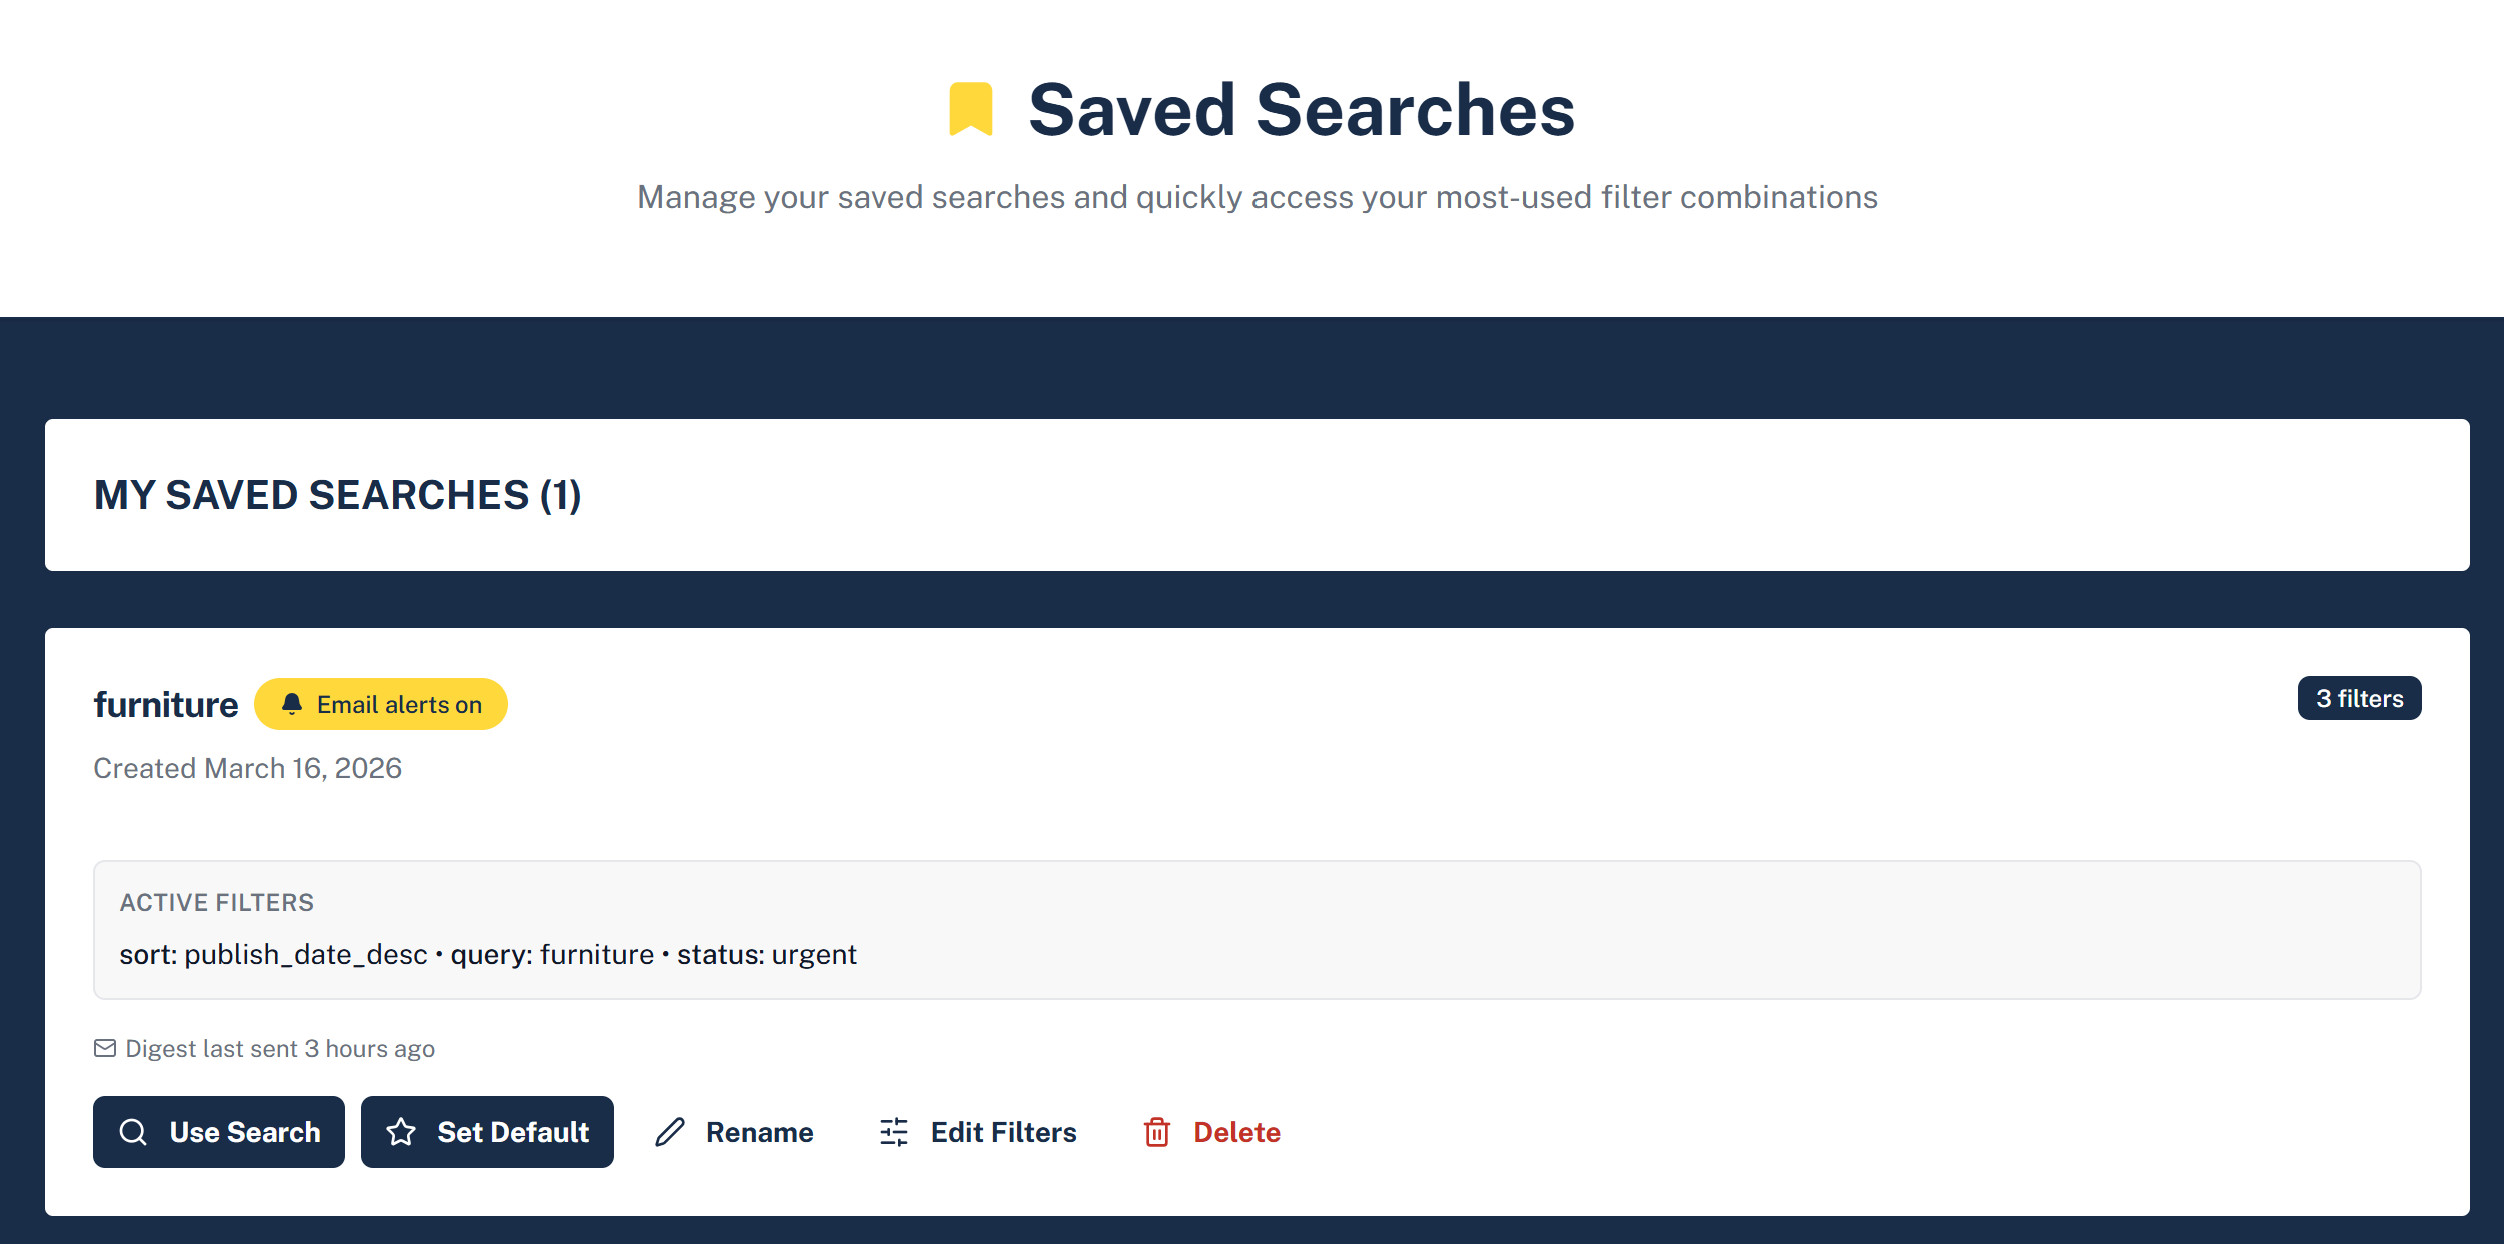
Create an alert to receive email digests of new matching opportunities — daily or weekly — without logging in every day.
- After applying your filters, click the Create Alert button next to the search bar. Give it a name and choose Daily or Weekly delivery.
- Manage all your alerts from the Alerts tab on the Search page — toggle email notifications, change frequency, rename, or delete.
- Click Run Search on any alert to load its filters into the Results tab instantly.
- Alert limits by plan: You can create an unlimited number of alerts. The limit only applies to how many can have email notifications active at once — Basic allows up to 2; Pro allows up to 5.
Tip
Watchlist
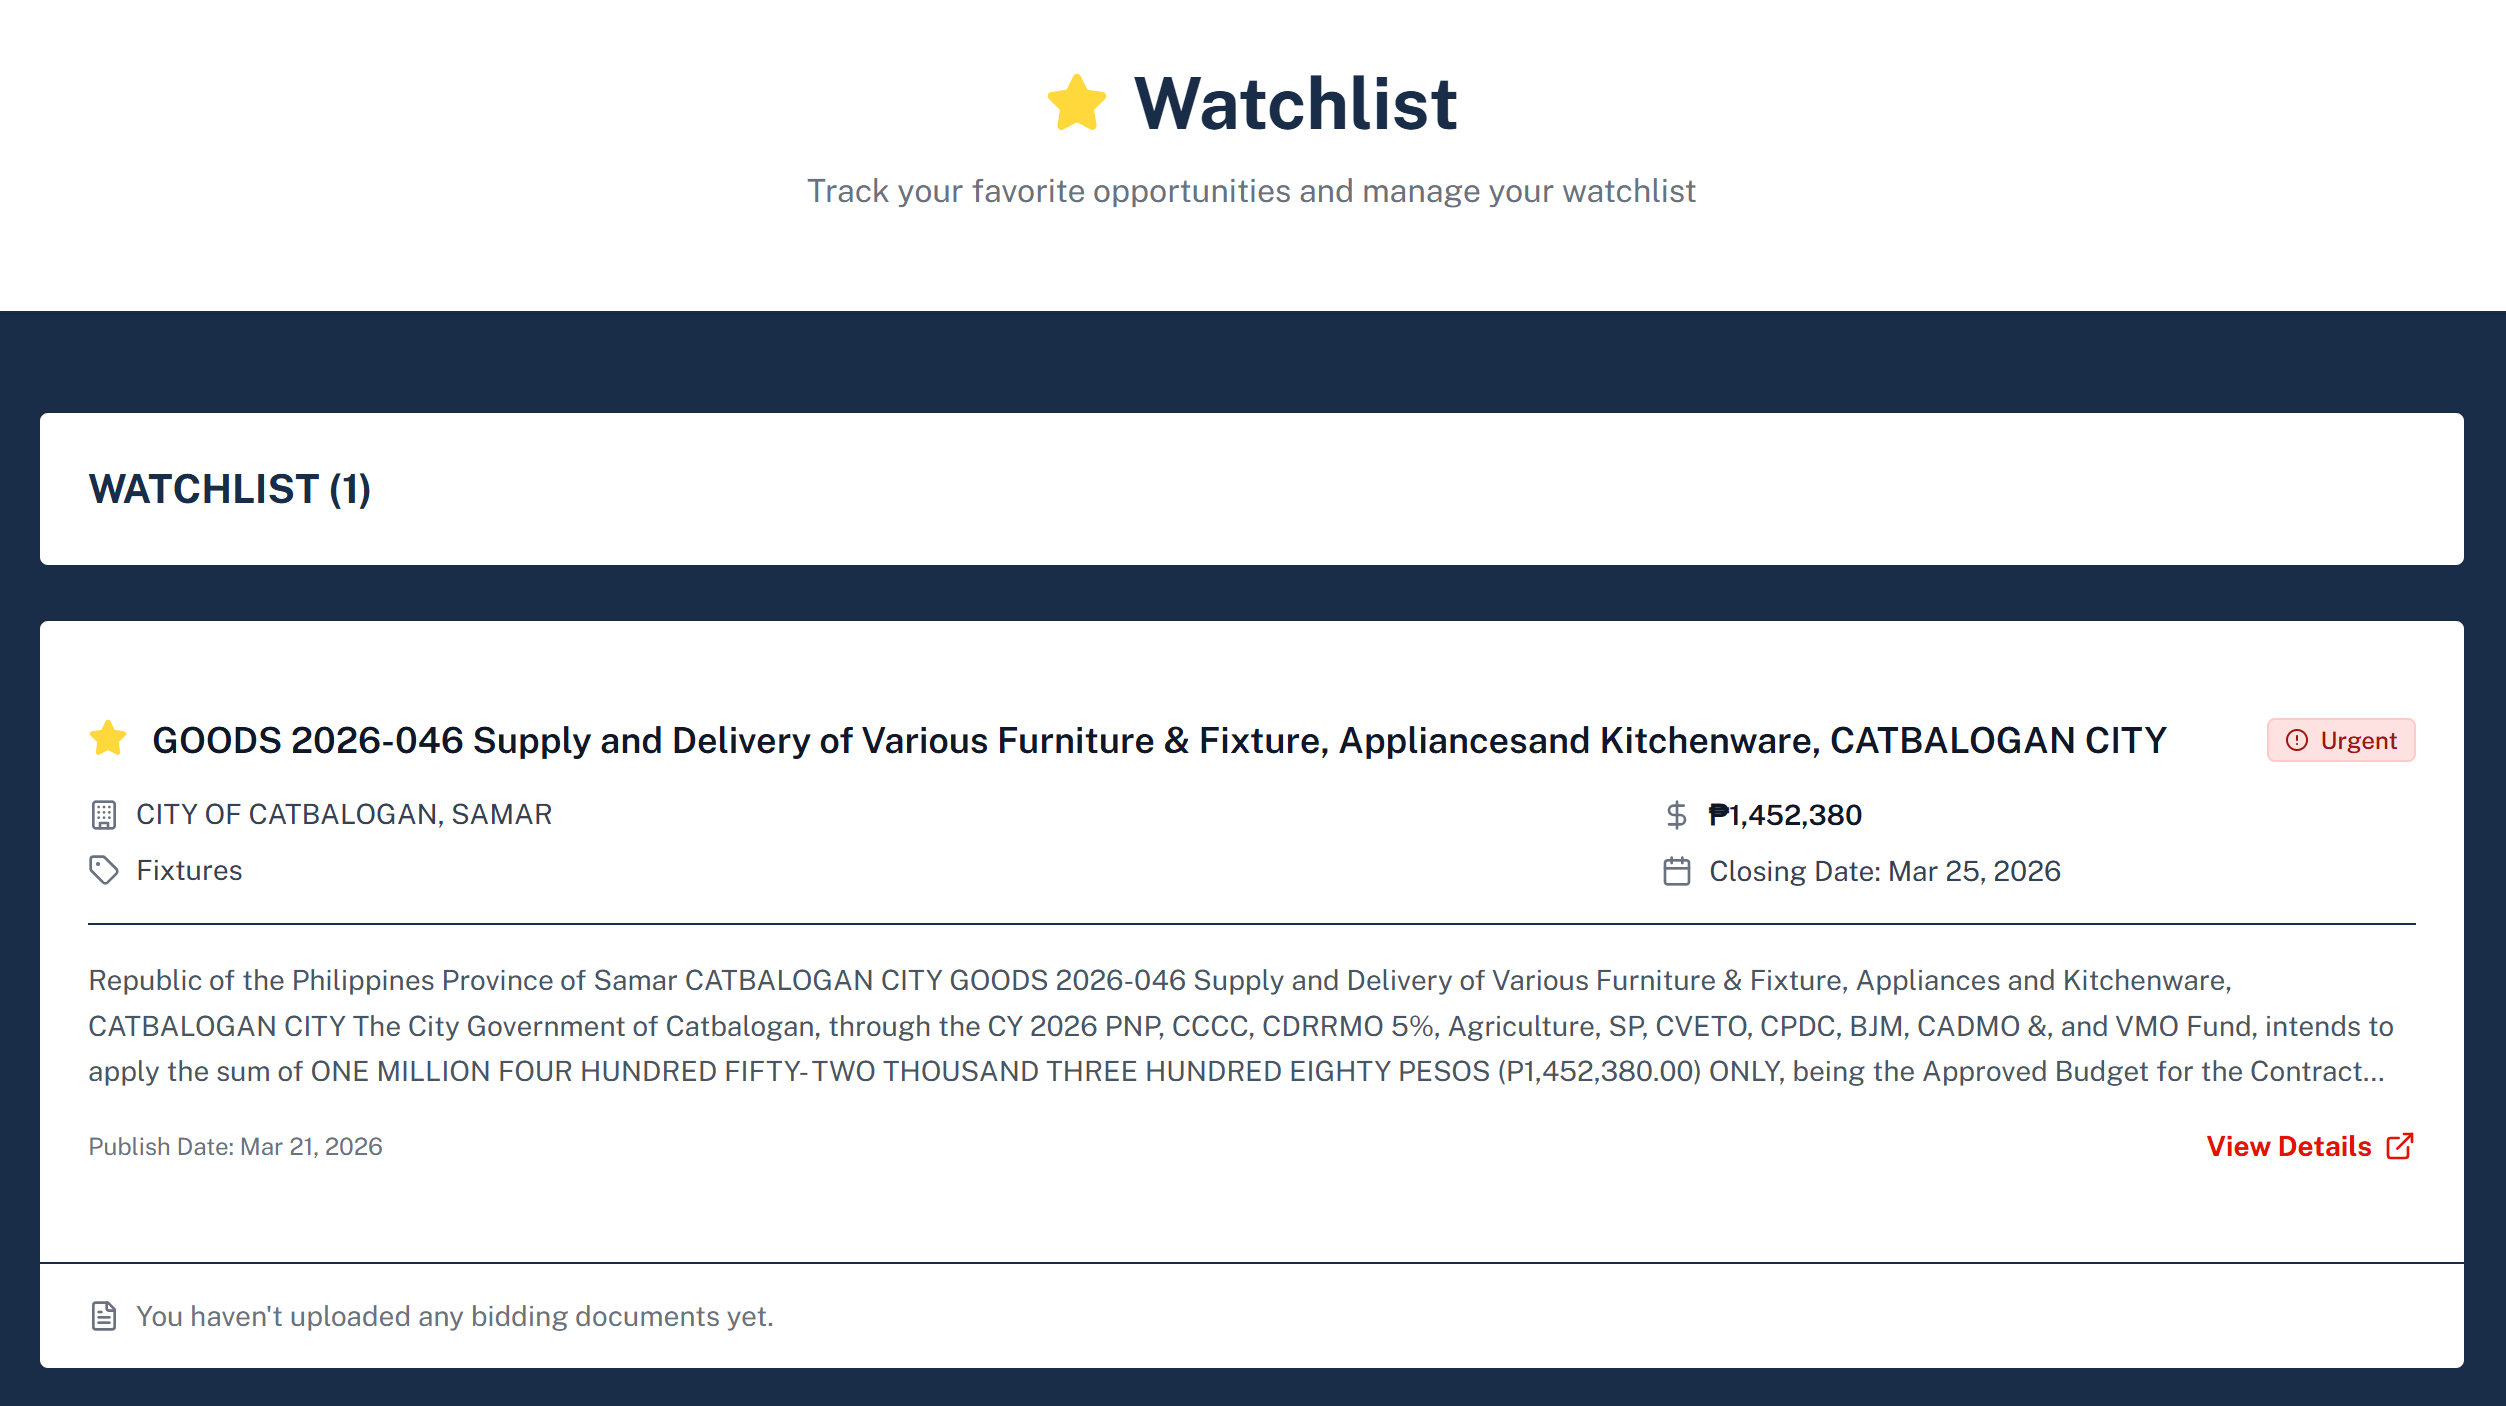
Your Watchlist is a personal shortlist of bids you're actively tracking. It's the fastest way to monitor closing deadlines across multiple opportunities without opening each one.
- Click the star icon on any bid card in search results, or on the bid detail page itself, to add it to your Watchlist.
- Each bid on your Watchlist shows its closing date and days remaining at a glance — no need to open the bid to check the deadline.
- If you've generated a document summary for a bid, that summary appears inline below the bid card — collapsed to a preview by default, with a Read more toggle to expand the full text. Review key details without re-opening the bid page.
- Unstar a bid at any time to remove it from your Watchlist.
Bid Details & Document Summaries
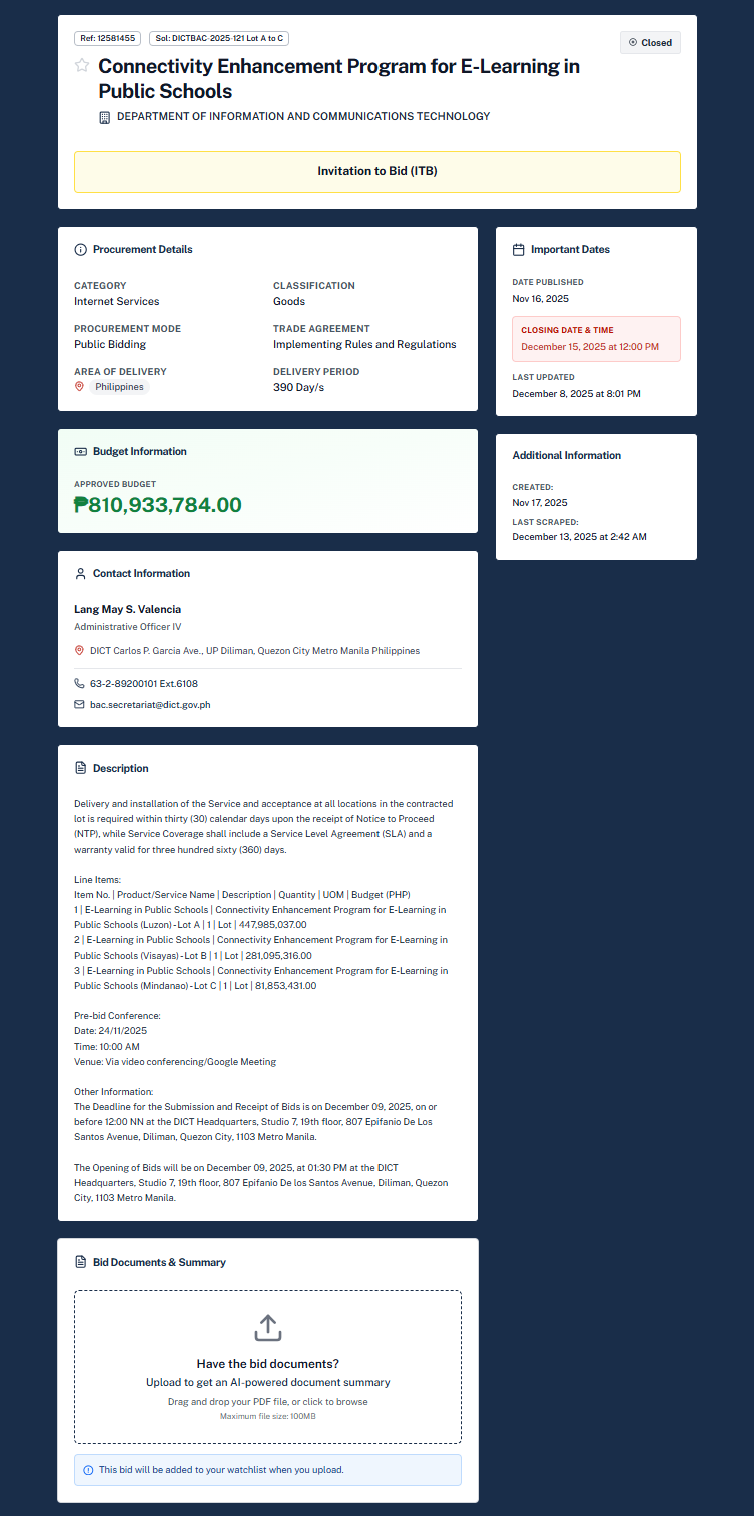
The bid detail page shows everything from the original PhilGEPS notice — and lets you generate an AI-powered document summary from the full bidding documents to save hours of reading.
- Click any bid in search results or your Watchlist to open its detail page. Viewing bid details is free and unlimited — open as many as you like.
- The page shows all fields from the PhilGEPS notice: procuring entity, ABC, notice type, category, classification, delivery period, trade agreement, and more.
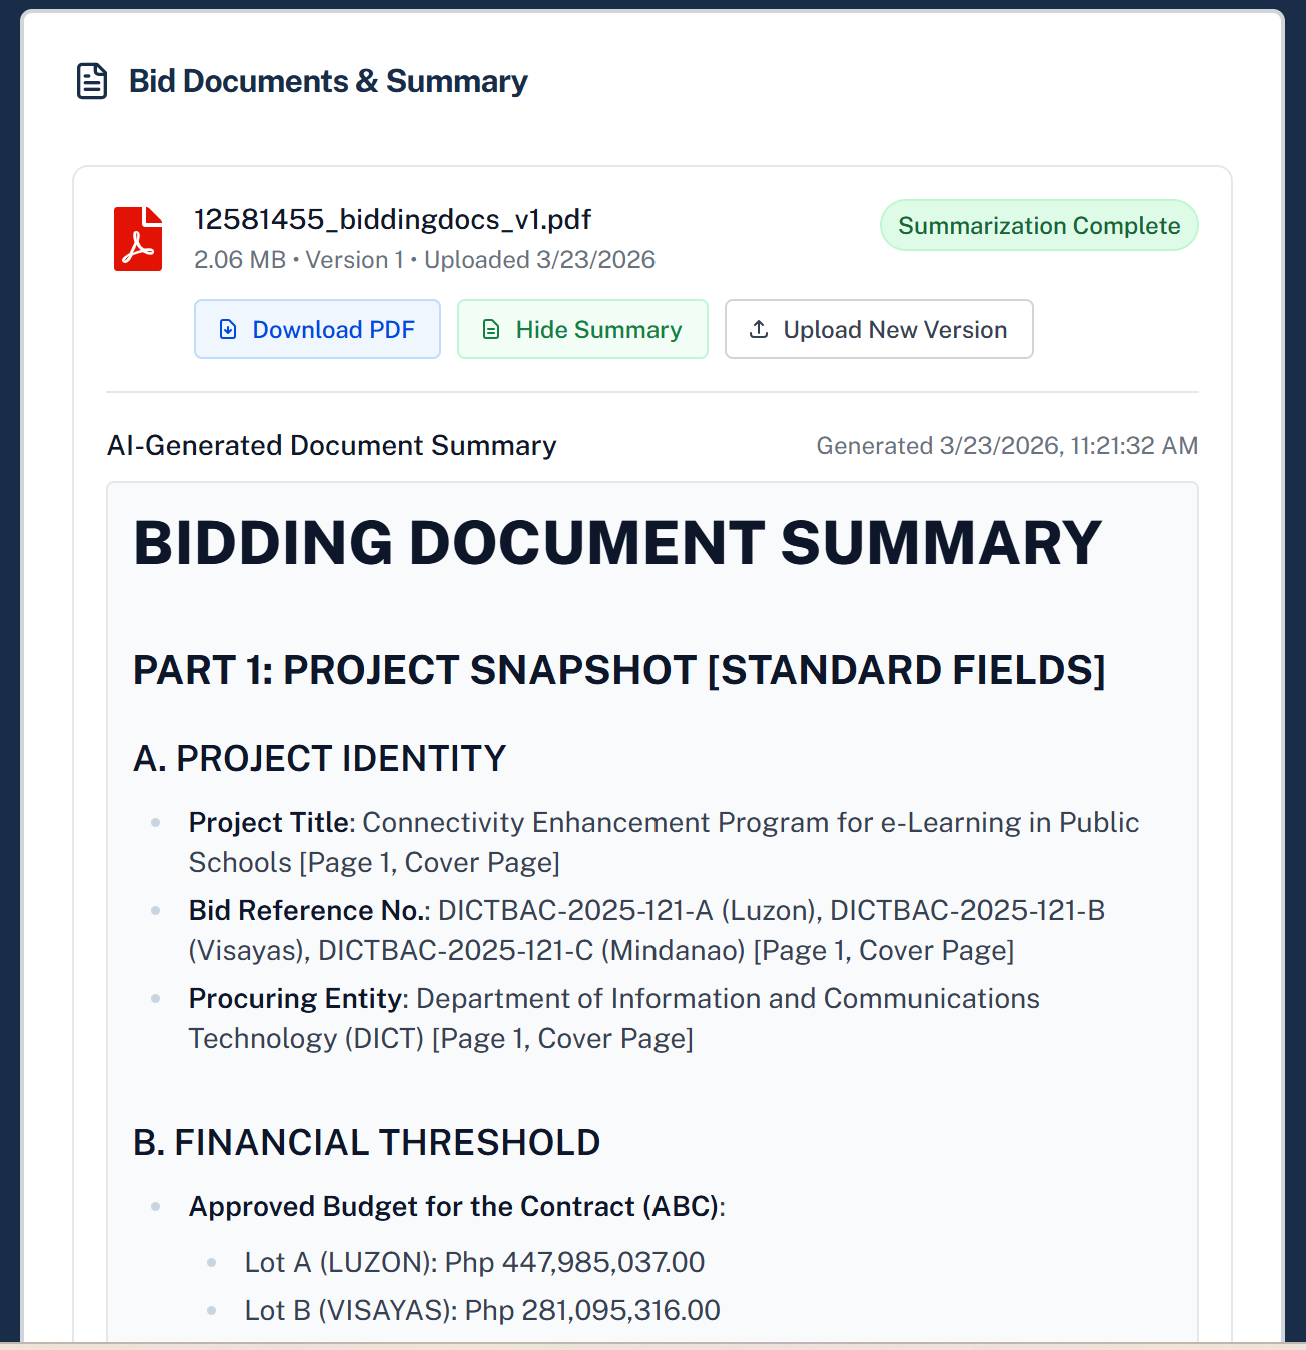
- To generate a document summary: Download the bidding documents from PhilGEPS, then upload the PDF on the bid detail page (up to 100 MB — most documents are well under 5 MB) and click Generate Summary. The AI reads the full document and extracts eligibility requirements, technical specifications, evaluation criteria, and submission instructions.
- Each document summary costs 100 points. Once generated, the summary is saved to that bid permanently — it will also appear inline on your Watchlist, collapsed to a preview with a Read more toggle.
Note
Account & Settings
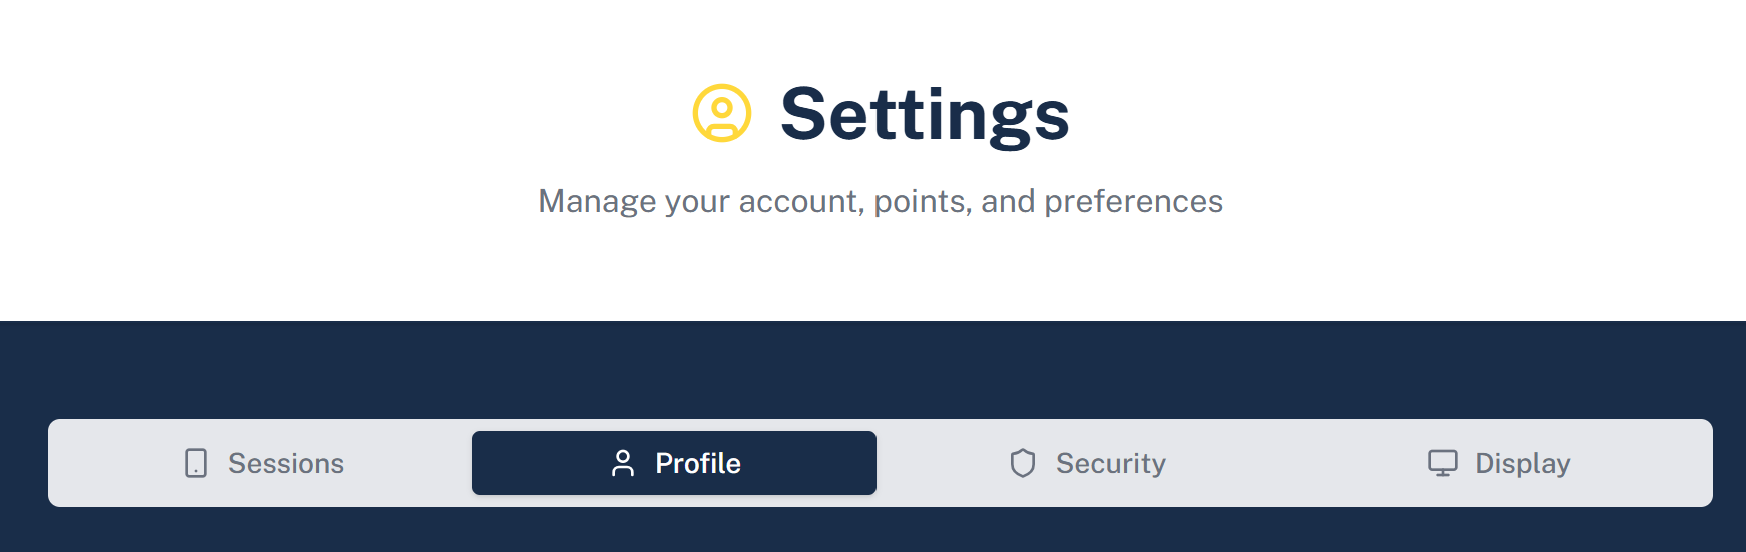
Open Settings from the profile menu in the top-right corner. It has three tabs:
- Profile tab: Update your first name, last name, company, occupation, and PhilGEPS User ID. Your email is shown but isn't editable here — see Changing your email below.
- Security tab: Change your password. Forgot it? Use the Forgot Password link on the login page.
- Sessions tab: View all active login sessions and revoke any you don't recognise. Basic accounts support one active session at a time; Pro supports up to five.
Two-Factor Authentication (2FA)
2FA adds a one-time code from an authenticator app on top of your password. Set it up from the 2FA setup page — the flow is:
- Open your authenticator app (Google Authenticator, Authy, 1Password, or similar) and scan the QR code shown on the setup page.
- Enter the 6-digit code from the app to verify and finish enrolment.
- After that, every login will ask for a fresh 6-digit code from your authenticator app in addition to your password.
Changing your email
Email changes aren't self-service yet. If you need to switch the email tied to your account, contact us and we'll handle the transfer manually.
Deleting your account
Account deletion is also handled by request. Reach out and we'll permanently remove your account, profile, Watchlist, alerts, and activity history. This action can't be undone — make sure you really want to before you ask.
What happens when you cancel
- You keep full access — search, alerts, watchlist, points — until the end of your current billing period. Nothing is cut off mid-cycle.
- Your account, Watchlist, alerts, and saved profile are preserved if you re-subscribe later. Pick up where you left off.
- Your monthly point allowance is tied to an active subscription and won't accumulate while you're cancelled.
- Any AI document summaries you generated stay attached to those bids — they'll still be there if you re-subscribe.
My Plan
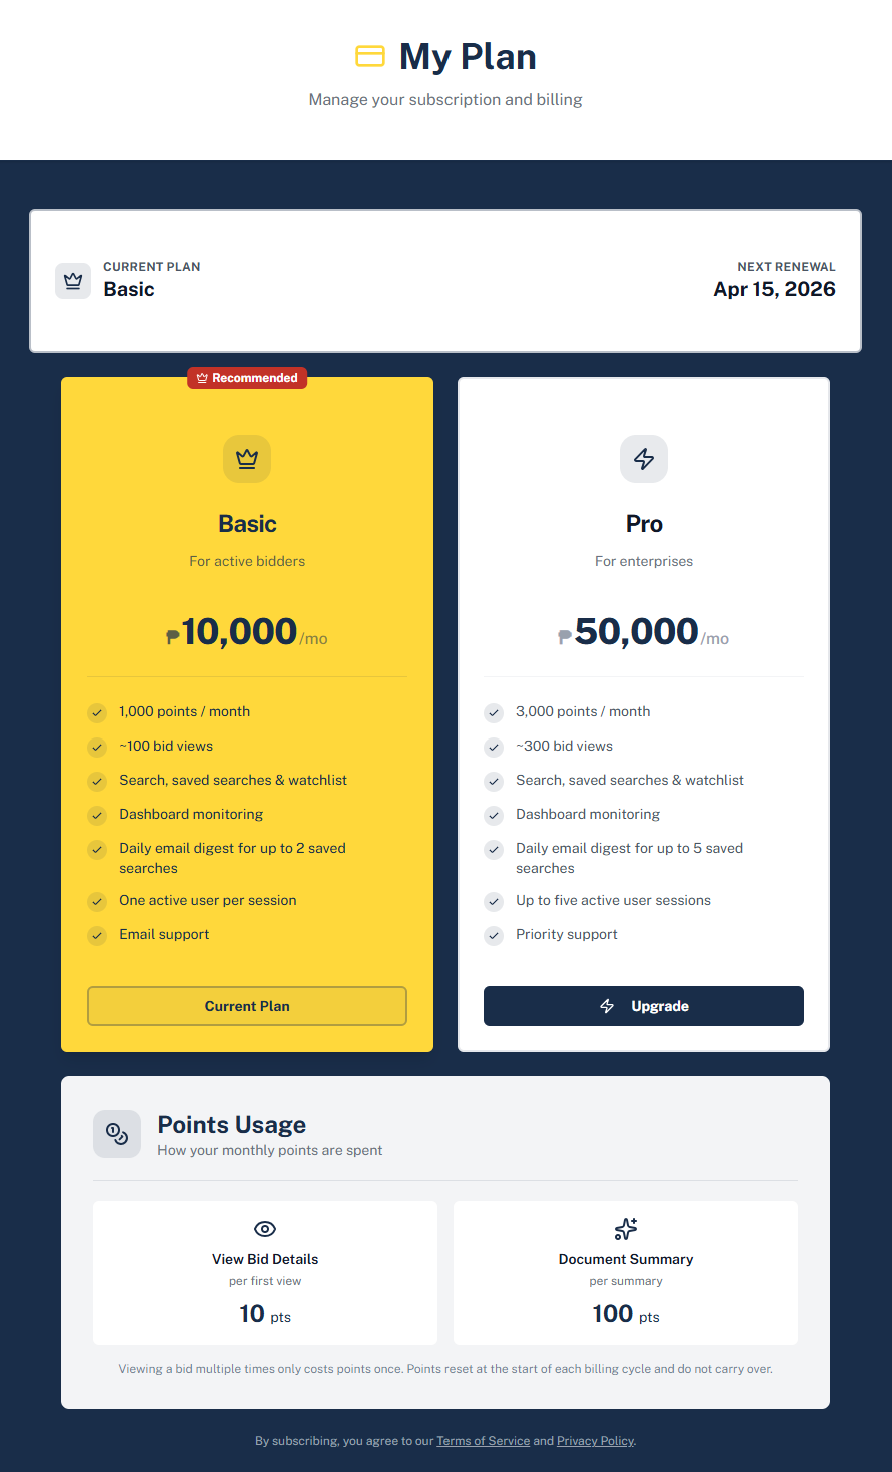
My Plan (accessible from the profile menu) shows your current subscription and lets you upgrade, downgrade, or cancel.
- Current plan card: Shows your active plan (Basic or Pro) and the next renewal date. If a plan change is pending, it shows the effective date and a Keep Plan option to reverse it before it takes effect.
- Basic — ₱1,199/mo: 1,000 points per billing cycle (~10 document summaries), email alerts for up to 2 alerts, one active session.
- Pro — ₱4,899/mo: 5,000 points per billing cycle (~50 document summaries), email alerts for up to 5 alerts, up to five active sessions.
- Points: Each plan includes a monthly points allowance that resets at the start of every billing cycle. See the Points System section for cost details and what happens when you run low.
- Cancelling: You keep full access until the end of your current billing period. Your Watchlist and Alerts are preserved if you re-subscribe later.
Points System
Points are Bidfinder's usage currency. Every plan includes a monthly allowance — points are spent only when you generate an AI-powered document summary. Everything else — searching, filtering, saving searches, creating alerts, starring bids, and viewing bid details — is free and unlimited.
What Costs Points
- Generating an AI-powered document summary — 100 points. The AI reads your uploaded PDF in full and extracts eligibility requirements, technical specs, evaluation criteria, and submission instructions. Once generated, the summary is saved permanently to that bid — re-reading it never costs additional points.
Nothing else costs points. Searching, filtering, saving searches, creating alerts, starring bids, and opening bid detail pages are all free and unlimited.
Monthly Allowance by Plan
| Plan | Points / Month | Bidding Document Summaries |
|---|---|---|
| Basic | 1,000 | ~10 |
| Pro | 5,000 | ~50 |
How the Allowance Works
- Points reset at the start of every billing cycle — unused points do not carry over to the next month.
- Your live balance is always visible in the top-right corner of the navigation bar — you always know what you have left before clicking anything that costs points.
- Running low? Document summaries are your only point cost — 100 points each. If you can already see the key details from the bid notice, you may not need the AI summary at all. Check the Activity page to see exactly where your points went.
Tip
Activity
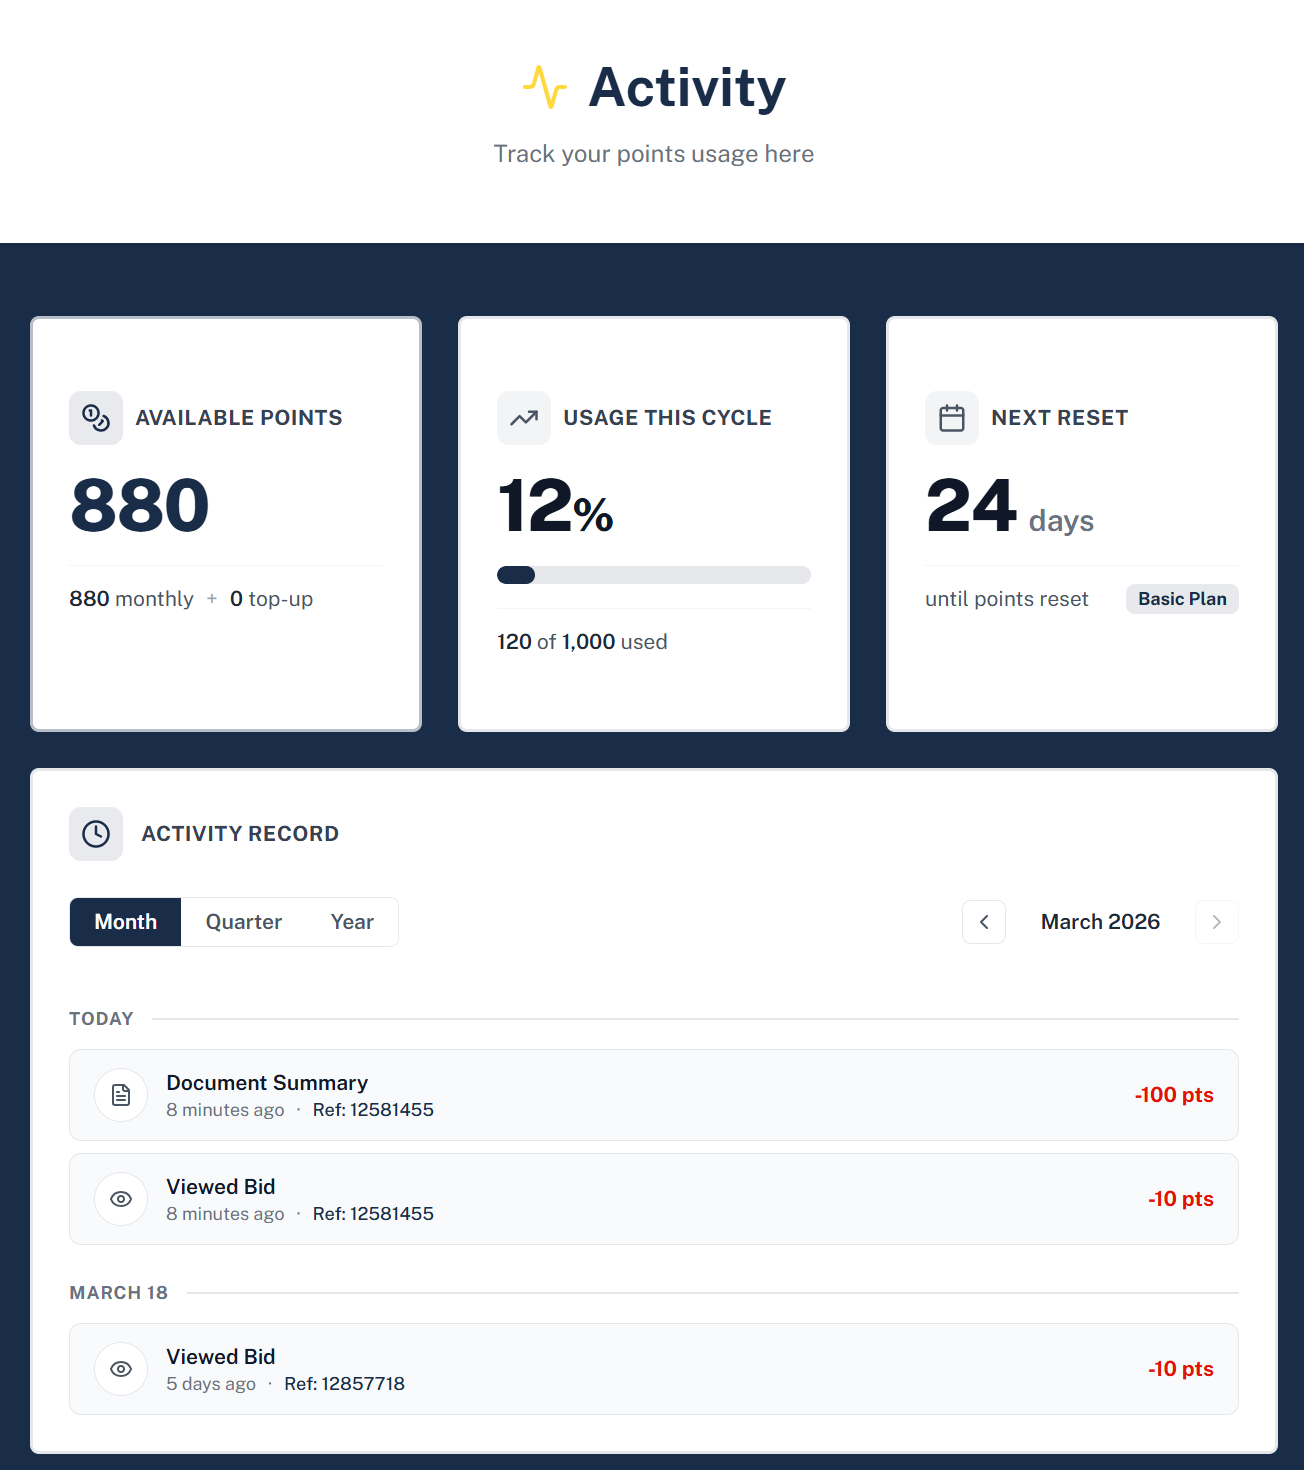
The Activity page (accessible from the profile menu) is your points dashboard — balance, usage, and a full log of every action that spent points.
- Available Points: Your total usable balance, broken down into monthly allowance remaining and any top-up balance.
- Usage This Cycle: Percentage of your monthly allowance spent so far, with a colour-coded progress bar (turns amber above 70%, red above 90%).
- Next Reset: Days remaining until your points renew, plus your current plan tier.
- Activity Record: A chronological log of every document summary you've generated, grouped by date. Filter by month, quarter, or year, and navigate back through past periods. Each entry links directly to the bid it relates to.
Tip
Still have questions? Check the FAQ or contact us.